Foundation(7)
Webhacking 강좌는 여러 절로 구성되어 있습니다.
- Foundation
- Foundation(1)
- Foundation(2)
- Foundation(3)
- Foundation(4)
- Foundation(5)
- Foundation(6)
- Foundation(7)
- Foundation(8)
- Assemble
PHP , MYSQL , JS , CSS+HTML 순으로 진행하겠습니다.
PHP
PHP FORM & POST
FORM
웹페이지에서는 form 요소를 사용하여 사용자로부터 입력을 받을 수 있고, 이때 GET 방식과 POST 방식으로 나누어 진다.
(1-1) html 파일
<!DOCTYPE html>
<html lang="en">
  <head>
    <meta charset="UTF-8" />
    <meta name="viewport" content="width=device-width, initial-scale=1.0" />
    <title>Document</title>
  </head>
  <body>
    <form action="form.php" method="GET">
      <!-- form 태그를 이용해 정보를 보낼 서버 지정-->
      <p><input type="text" name="title" placeholder="Title" /></p>
      <!-- 텍스트 칸 생성-->
      <p><textarea name="description"></textarea></p>
      <!-- 더 많은 양의 텍스트를 쓸 수 있는 텍스트 칸 생성-->
      <p><input type="submit" /></p>
      <!-- 서버로 텍스트 칸에 저장된 정보 전송-->
    </form>

    <!-- form 작동방식  :: 각각의 이름으로 저장된 데이터들이 form 태그에 저장되어 있는 파일로 데이터가 전송된다. -->
  </body>
</html>
form 태그에서 데이터 전송 method(‘GET’, ‘POST’)를 선택할 수 있다.
(이때, 기본 method를 설정해주지 않으면 GET 메소드를 사용)
(1-2) PHP 파일
<?php
file_put_contents('data/'.$_GET['title'], $_GET['description']); // 'title'로 파일을 생성하고, 안에 'description' 내용을 넣는다.
//file_put_contents('data/'.$_POST['title'], $_POST['description']);
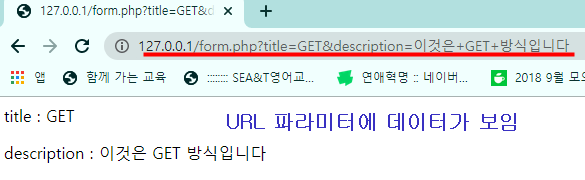
echo "<p>title : ".$_GET['title']."</p>";
echo "<p>description : ".$_GET['description']."</p>";
// GET 메소드를 이용해 데이터를 전송하면 URL 파라미터에 데이터 정보가 노출되는 위험이 있다. (북마크에서 주로 GET메소드 사용)
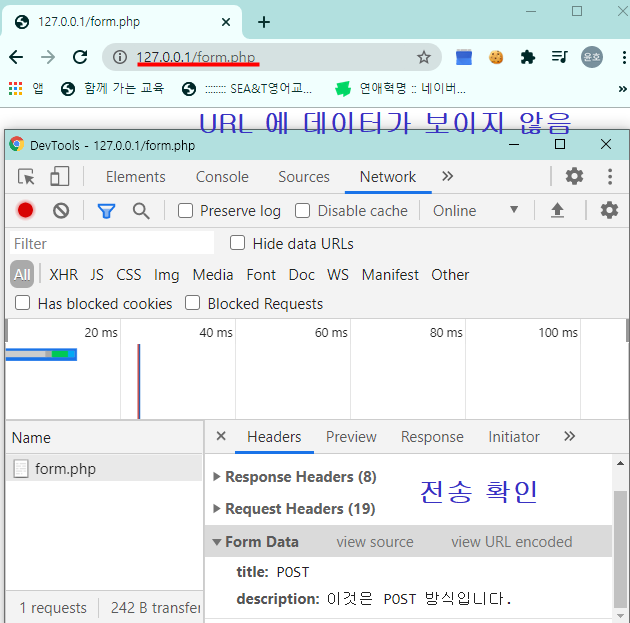
// 이때, POST 메소드를 URL 파라미터에 정보가 노출되지 않는다.
?>
<GET 방식>
<POST 방식>
++ 글생성
(2-1) create.php 파일
<!DOCTYPE html>
<html lang="en">
<head>
    <meta charset="UTF-8">
    <meta name="viewport" content="width=device-width, initial-scale=1.0">
    <title>
    <?php
    print_title();
    ?>
    </title>
</head>
<body>
    <h1><a href="index.php">WEB</a></h1>
    <ol>
    <?php
    print_list();
     ?>
    </ol>
    <a href="create.php">create</a>
    <form action="create_process.php" method="post">                     <!-- POST 방식을 통해 데이터를 'create_process.php'로 전송-->
        <p>
            <input type="text" name="title" placeholder='Title'>
        </p>
        <p>
            <textarea name="description" placeholder="Description"></textarea>
        </p>
        <p>
            <input type="submit">
        </p>
    </form>
</body>
</html>
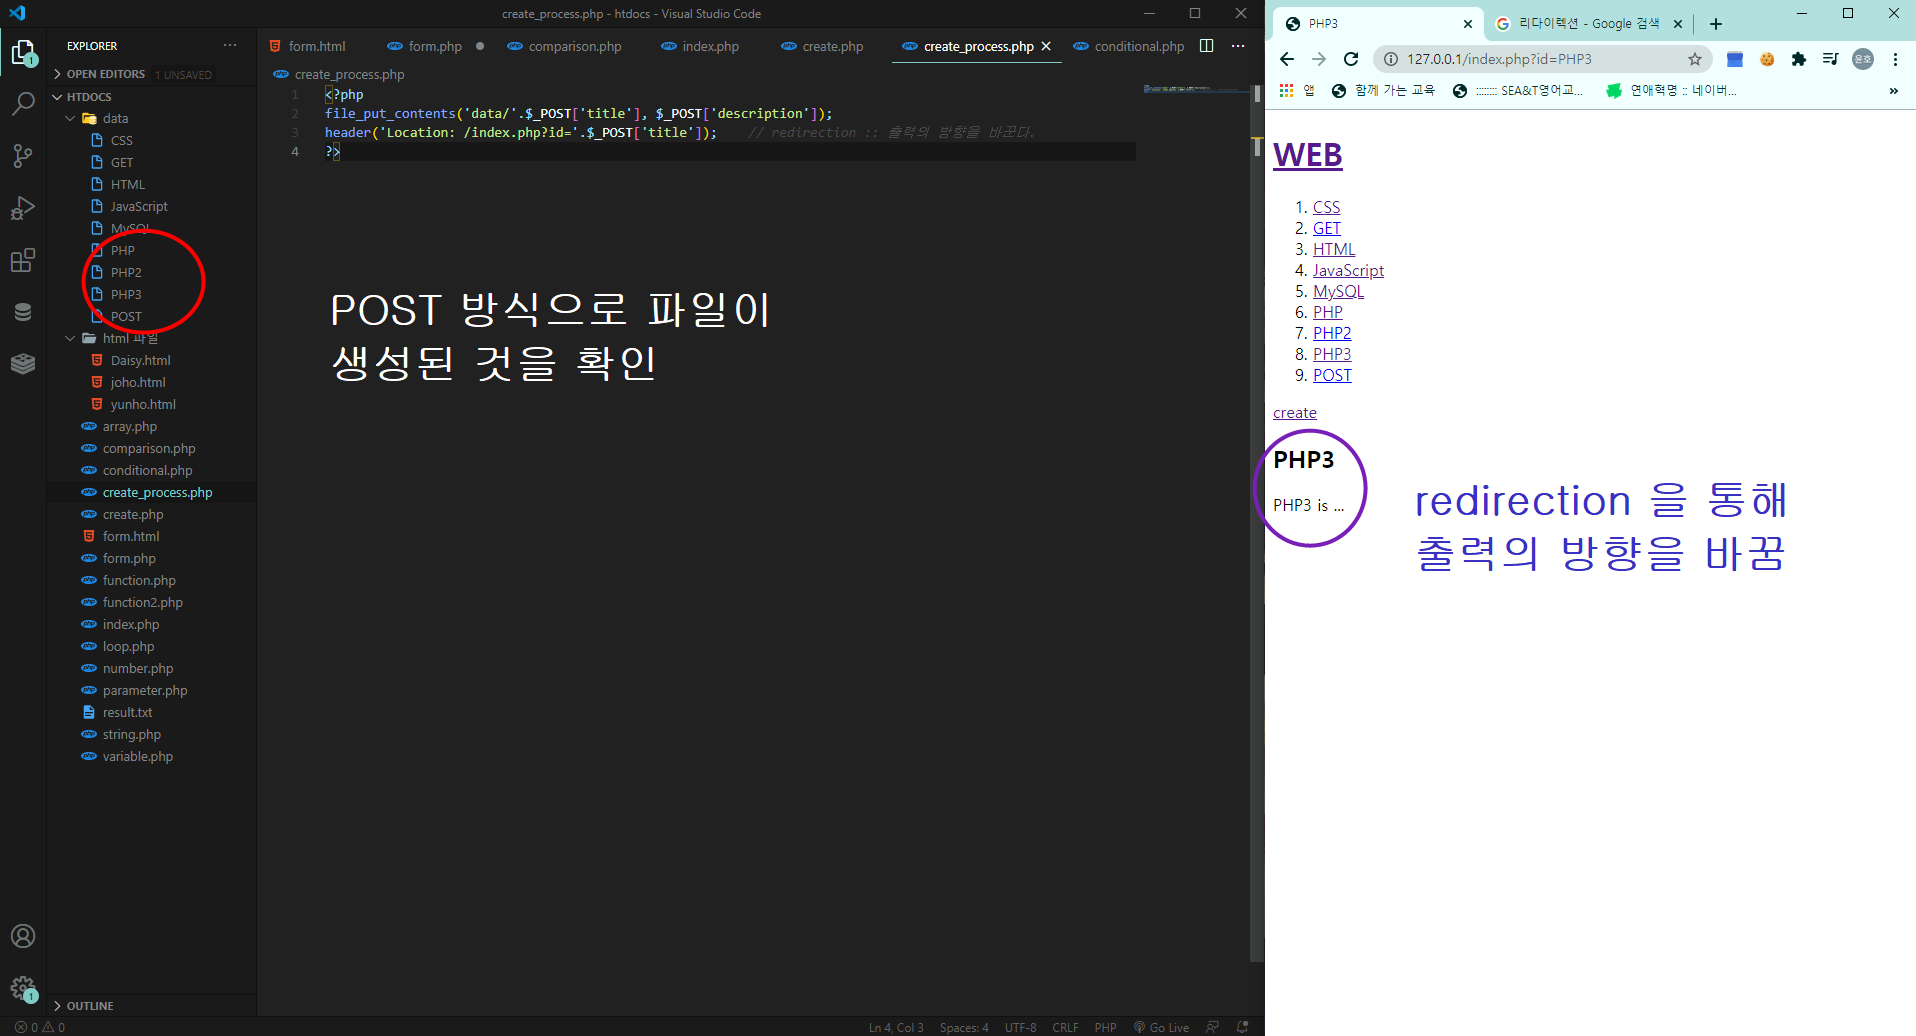
(2-2) create_process.php 파일
<?php
file_put_contents('data/'.$_POST['title'], $_POST['description']);
header('Location: /index.php?id='.$_POST['title']);    // redirection :: 출력의 방향을 바꾼다.
?>
<결과>
++ 글수정
(3-1) index.php 파일
<!DOCTYPE html>
<html lang="en">
<head>
    <meta charset="UTF-8">
    <meta name="viewport" content="width=device-width, initial-scale=1.0">
    <title>
    <?php
    print_title();
    ?>
    </title>
</head>
<body>
    <h1><a href="index.php">WEB</a></h1>
    <ol>
    <?php
    print_list();
     ?>
    </ol>
    <a href="create.php">create</a>
    <?php if(isset($_GET['id'])) { ?>                         <!-- id 값이 존재해야만 출력 -->
        <a href="update.php?id=<?=$_GET['id']?>">update</a>
    <?php } ?>
    <h2>
        <?php
        print_title();
        ?>
    </h2>
    <?php
    print_description();
    ?>
</body>
</html>
(3-2) update.php 파일
<!DOCTYPE html>
<html lang="en">
<head>
    <meta charset="UTF-8">
    <meta name="viewport" content="width=device-width, initial-scale=1.0">
    <title>
    <?php
    print_title();
    ?>
    </title>
</head>
<body>
    <h1><a href="index.php">WEB</a></h1>
    <ol>
    <?php
    print_list();
     ?>
    </ol>
    <a href="create.php">create</a>
    <?php if(isset($_GET['id'])) { ?>                         <!-- id 값이 존재해야만 출력 -->
        <a href="update.php?id=<?=$_GET['id']?>">update</a>
    <?php } ?>
    <h2>
        <?php
        print_title();
        ?>
    </h2>
    <?php
    print_description();
    ?>

    <form action="update_process.php" method="post">                     <!-- POST 방식을 통해 데이터를 'create_process.php'로 전송-->
    <input type="hidden" name="old_title" value="<?=$_GET['id']?>">      <!-- 기존의 데이터를 'old_title' 이름으로 전송-->
        <p>
            <input type="text" name="title" placeholder='Title' value="<?php print_title(); ?>">
        </p>
        <p>
            <textarea name="description" placeholder="Description"><?php print_description(); ?></textarea>
        </p>
        <p>
            <input type="submit">
        </p>
    </form>
</body>
</html>
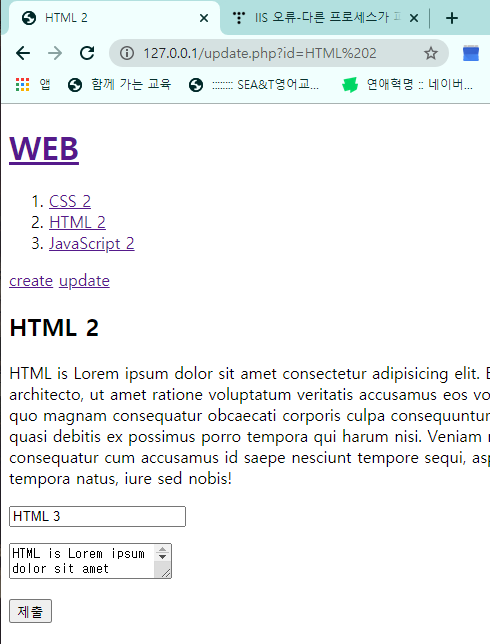
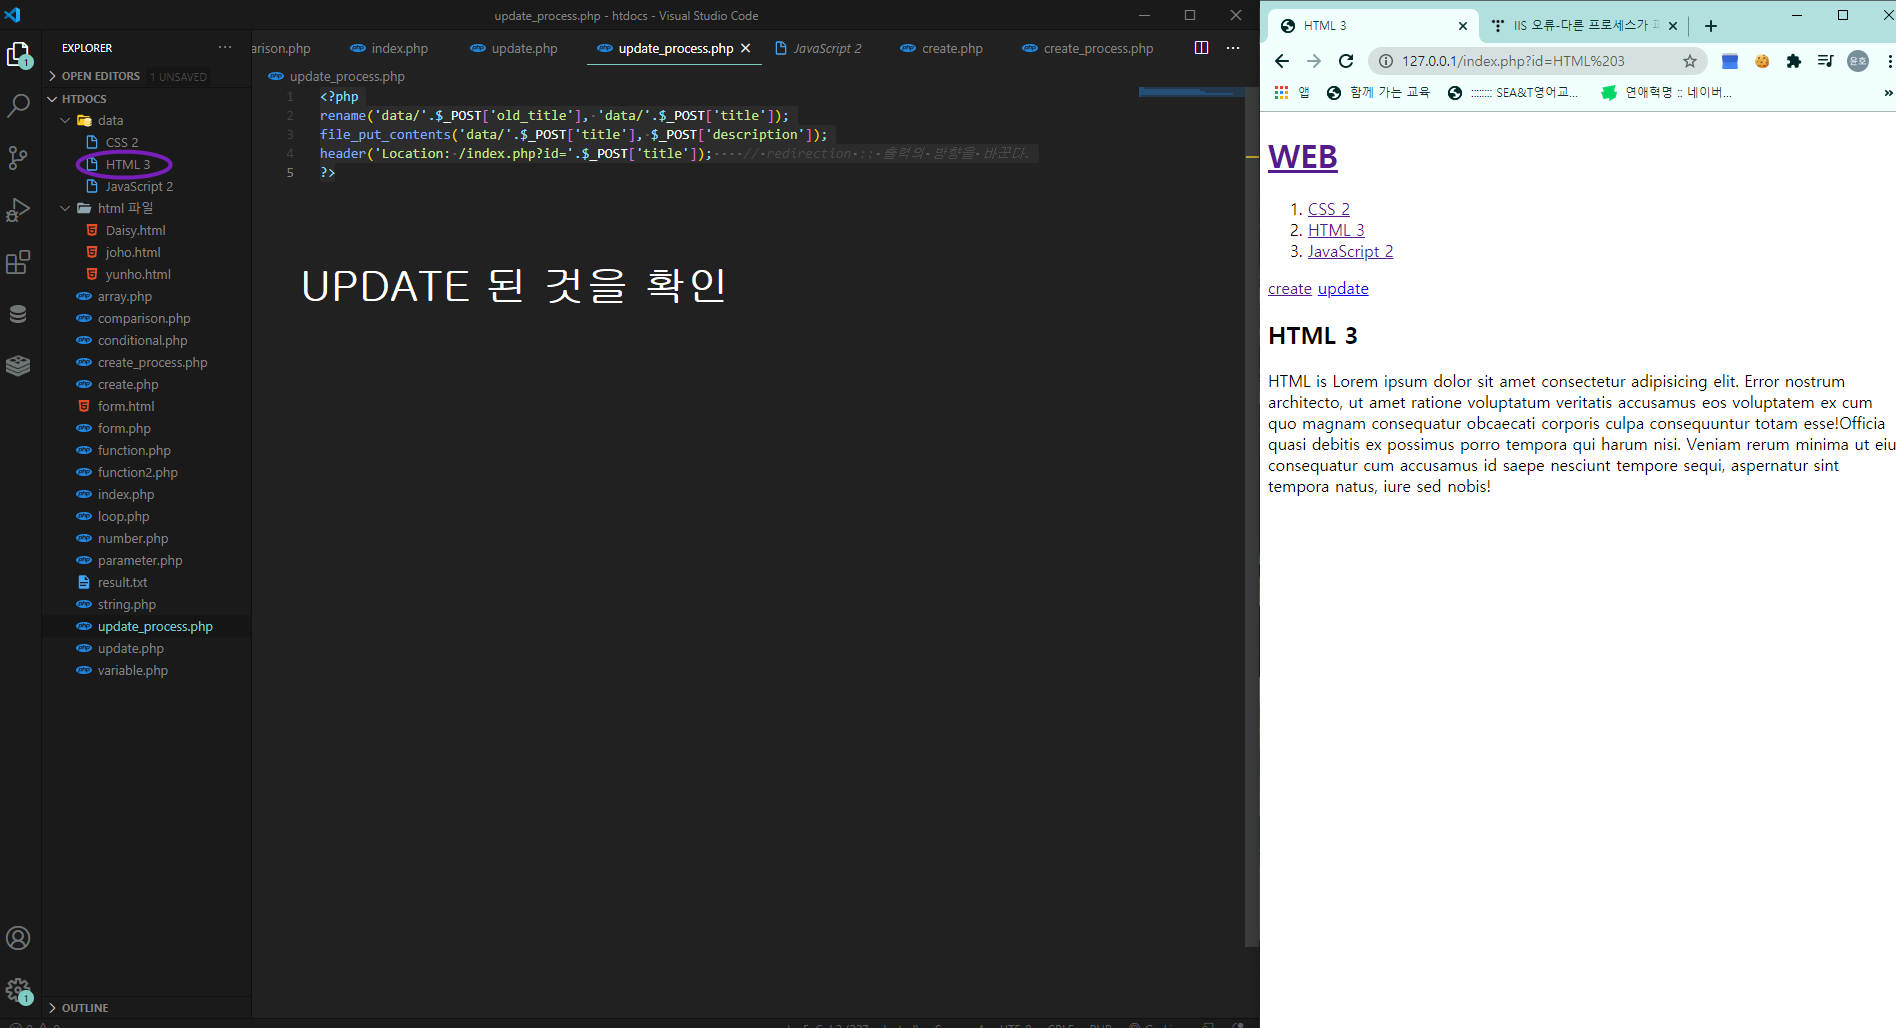
(3-3) update_process.php 파일
<?php
rename('data/'.$_POST['old_title'], 'data/'.$_POST['title']);
file_put_contents('data/'.$_POST['title'], $_POST['description']);
header('Location: /index.php?id='.$_POST['title']);    // redirection :: 출력의 방향을 바꾼다.
?>
<UPDATE 전>
<UPDATE 후>
++ 글삭제
(4-1) index.php 파일
<!DOCTYPE html>
<html lang="en">
<head>
    <meta charset="UTF-8">
    <meta name="viewport" content="width=device-width, initial-scale=1.0">
    <title>
    <?php
    print_title();
    ?>
    </title>
</head>
<body>
    <h1><a href="index.php">WEB</a></h1>
    <ol>
    <?php
    print_list();
     ?>
    </ol>
    <a href="create.php">create</a>
    <?php if(isset($_GET['id'])) { ?>                         <!-- id 값이 존재해야만 출력 -->
        <a href="update.php?id=<?=$_GET['id']?>">update</a>
        <form action="delete_process.php" method="post">
            <input type="hidden" name="id" value="<?=$_GET['id']?>">
            <input type="submit" value="delete">              <!-- delete 는 굳이 form 태그를 거쳐야 할 필요 x -->
        </form>
    <?php } ?>
    <h2>
        <?php
        print_title();
        ?>
    </h2>
    <?php
    print_description();
    ?>
</body>
</html>
(4-2) delete_process.php 파일
<?php
unlink('data/'.$_POST['id']);
header('Location: /index.php');
?>
<DELETE 전>
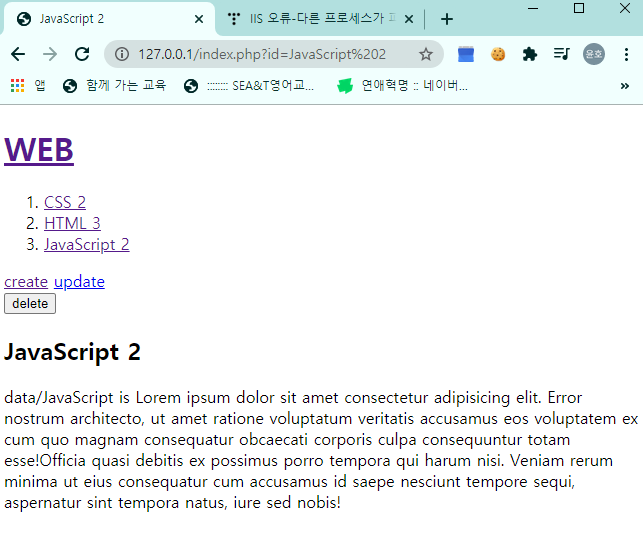
<DELETE 후>

PHP 그동안의 실습 리팩토링과 모듈화
<?php
require_once('lib/print.php');
require_once('Vview/ttop.php');
?>
    <a href="create.php">create</a>
    <?php if(isset($_GET['id'])) { ?>                         <!-- id 값이 존재해야만 출력 -->
        <a href="update.php?id=<?=$_GET['id']?>">update</a>
        <form action="delete_process.php" method="post">
            <input type="hidden" name="id" value="<?=$_GET['id']?>">
            <input type="submit" value="delete">              <!-- delete 는 굳이 form 태그를 거쳐야 할 필요 x -->
        </form>
    <?php } ?>
    <h2>
        <?php
        print_title();
        ?>
    </h2>
    <?php
    print_description();
    ?>
<?php
require('Vview/bottom.php');
?>
<lib/print.php>
<?php
function print_title(){
    if(isset($_GET["id"])) {
        echo $_GET["id"];
    } else {
        echo "Welcome!";
    }
}
function print_description(){
    if(isset($_GET['id'])) {
        echo file_get_contents("data/".$_GET['id']);
    } else {
        echo "This is 'index.php' file";
    }
}
function print_list(){
    $list = scandir('./data');

    $i = 0;

    while($i < count($list)) {
        if($list[$i] != '.' && $list[$i] != '..') {

            echo "<li><a href=\"index.php?id=$list[$i]\">$list[$i]</a></li>\n";
        }
        $i += 1;
    }
}
?>
<Vview/ttop.php>
<?php
require_once('lib/print.php');
?>
<!DOCTYPE html>
<html lang="en">
<head>
    <meta charset="UTF-8">
    <meta name="viewport" content="width=device-width, initial-scale=1.0">
    <title>
    <?php
    print_title();
    ?>
    </title>
</head>
<body>
    <h1><a href="index.php">WEB</a></h1>
    <ol>
    <?php
    print_list();
     ?>
    </ol>
<Vview/bottom.php>
</body>
</html>
이와 같이 중복되는 코드를 따로 폴더에 저장해둬서 코드를 간단하게 표현할 수 있다.
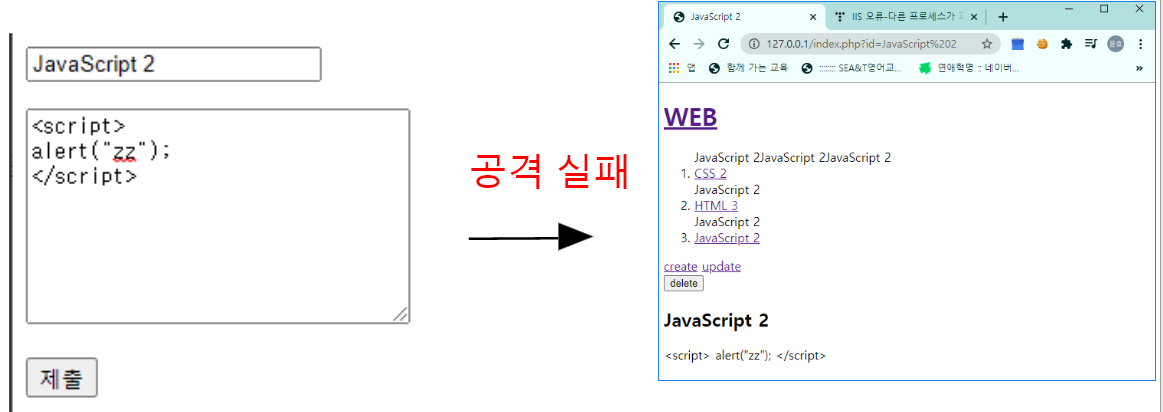
PHP XSS 보안
업데이트란에 스크립트 구문을 삽입하여 공격이 가능하다. 이를 XSS 공격이라고 한다.
<보안코드 xss.php>
<!DOCTYPE html>
<html lang="en">
<head>
    <meta charset="UTF-8">
    <meta name="viewport" content="width=device-width, initial-scale=1.0">
    <title>Document</title>
</head>
<body>
    <?php
    echo htmlspecialchars('<script>alert("babo");</script>');          //  스크립트 코드 변환
    ?>
</body>
</html>
<보안코드 print.php>
<?php
function print_title(){
    if(isset($_GET["id"])) {
        echo htmlspecialchars($_GET['id']);
    } else {
        echo "Welcome!";
    }
}
function print_description(){
    if(isset($_GET['id'])) {
        echo htmlspecialchars(file_get_contents("data/".$_GET['id']));
    } else {
        echo "This is 'index.php' file";
    }
}
function print_list(){
    $list = scandir('./data');
    $i = 0;
    while($i < count($list)) {
        echo htmlspecialchars($_GET['id']);
        if($list[$i] != '.' && $list[$i] != '..') {
            echo "<li><a href=\"index.php?id=$list[$i]\">$list[$i]</a></li>\n";
        }
        $i += 1;
    }
}
?>
<결과>
PHP 파일 경로 보호
<보안코드 print.php>
<?php
function print_title(){
    if(isset($_GET["id"])) {
        echo htmlspecialchars($_GET['id']);
    } else {
        echo "Welcome!";
    }
}
function print_description(){
    if(isset($_GET['id'])) {
        $basename = basename($_GET['id']);                          // basename을 이용해 파라미터 공격을 막음
        echo htmlspecialchars(file_get_contents("data/".$basename));
    } else {
        echo "This is 'index.php' file";
    }
}
function print_list(){
    $list = scandir('./data');
    $i = 0;
    while($i < count($list)) {    ㅁ
        echo htmlspecialchars($_GET['id']);
        if($list[$i] != '.' && $list[$i] != '..') {
            echo "<li><a href=\"index.php?id=$list[$i]\">$list[$i]</a></li>\n";
        }
        $i += 1;
    }
}
?>
<보안코드 delete_process.php>
<?php
unlink('data/'.basename($_POST['id']));
header('Location: /index.php');
?>
MySQL
MySQL 인터넷과 데이터베이스 관계
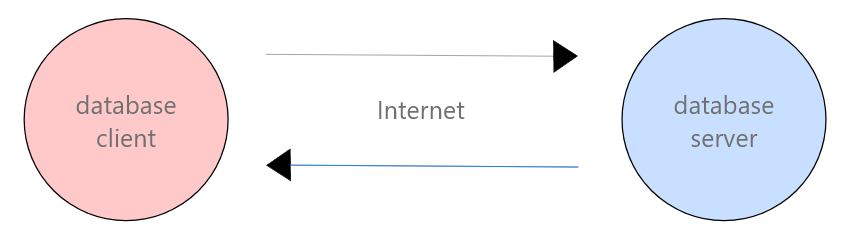
클라이언트는 인터넷을 거쳐 서버에 요청을 보내고, 인터넷은 다시 서버를 통해 사용자에게 받은 요청을 응답한다.
이과정에서 MySQL은 클라이언트가 서버에서 요구하는 데이터를 보관하고 관리하는 역할을 수행한다.
MySQL Client
MySQl Client(CUI)
Ex) MySQL monitor
MySQl Client(GUI)
Ex) MySQL Workbench
MySQL Workbench
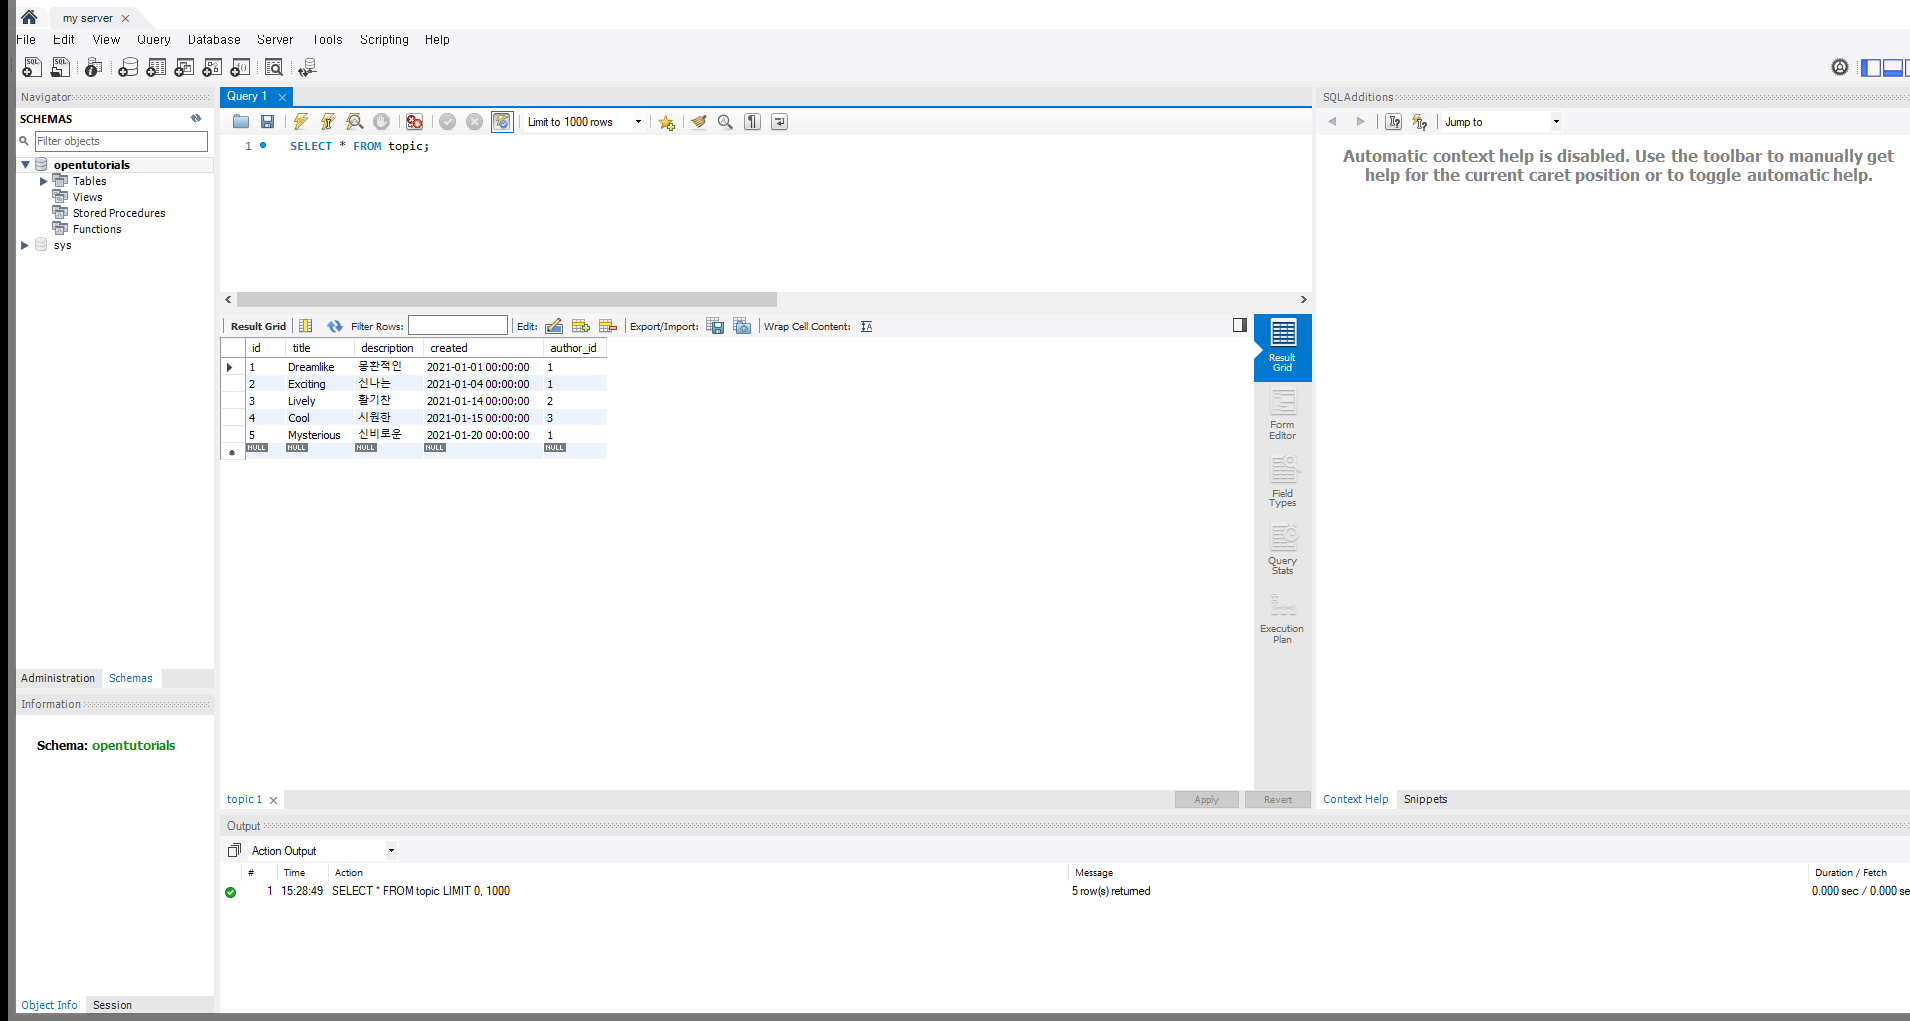
사용법은 유튜브 참고
JavaScript
JS 함수
함수(function)
프로그램에서 반복적으로 사용할 수 있는 문자의 블록을 의미한다.
<!DOCTYPE html>
<html lang="en">
  <head>
    <meta charset="UTF-8" />
    <meta http-equiv="X-UA-Compatible" content="IE=edge" />
    <meta name="viewport" content="width=device-width, initial-scale=1.0" />
    <title>Document</title>
  </head>
  <body>
    <h1>Function</h1>
    <h2>Basic</h2>
    <ul>
      <script>
        function two() {
          document.write("<li>2-1</li>"); // 반복되는 부분을 함수로 묶어서 표현
          document.write("<li>2-2</li>");
        }
        document.write("<li>1</li>");
        two(); // 함수 실행
        document.write("<li>3</li>");
        two(); // 함수 실행
      </script>
    </ul>
    <h2>Parameter & Argument</h2>
    <script>
      function onePlusOne() {
        // 항상 같은 결론을 출력
        document.write(1 + 1);
        document.write("<br>");
      }
      onePlusOne(); // '2' 출력

      function sum(left, right) {
        // 입력값에 따라서 달라지는 함수
        document.write(left + right + "<br>"); // 함수 안에 parameter를 사용해서 argument를 받을 수 있도록 설정한다.
      }
      sum(2, 3); // '5' 출력
      sum(3, 4); // '7' 출력
    </script>
    <h2>Return</h2>
    <script>
      function sum2(left, right) {
        // return을 이용해 여러 곳에서 사용할 수 있는 함수가 되었다.
        return left + right;
      }
      document.write(sum2(2, 3) + "<br>");
      document.write('<div style="color:red">' + sum2(2, 3) + "</div>");
      document.write('<div style="font-size:3rem;">' + sum2(2, 3) + "</div>");
    </script>
  </body>
</html>
++ 함수 활용
ex3.html에 기능하는 부분을 함수로 만들면 이러한 기능을 손쉽게 여러개로 만들 수 있다.
<!DOCTYPE html>
<html lang="en">
  <head>
    <meta charset="UTF-8" />
    <meta name="viewport" content="width=device-width, initial-scale=1.0" />
    <script>
      function nightDayHandler(self) {
        var target = document.querySelector("body"); // target으로 바꿔서 보기 쉽게 만든다.
        if (self.value === "night") {
          // this :: 호출에 따라 달라지는 것
          target.style.backgroundColor =
            "black"; /* doucument.querySelector('#night_day2')는 자기자신
                                                                        을 가리키고 있으므로 this로 바꾼다. */
          target.style.color = "white";
          self.value = "day";

          var alist = document.querySelectorAll("a"); // 'a' 태그가 포합된 모든 코드를 배열에 저장
          var i = 0;
          while (i < alist.length) {
            // alist 안에 배열의 길이를 가져와서 반복 횟수를 정함
            console.log(alist[i]);
            alist[i].style.color = "powderblue"; // 각 태그에 색을 지정
            i = i + 1;
          }
        } else {
          target.style.backgroundColor = "white";
          target.style.color = "black";
          self.value = "night";

          var alist = document.querySelectorAll("a");
          var i = 0;
          while (i < alist.length) {
            console.log(alist[i]);
            alist[i].style.color = "blue";
            i = i + 1;
          }
        }
      }
    </script>
    <title>Document</title>
  </head>
  <body>
    <h1><a href="index.html">WEB</a></h1>

    <input
      id="night_day"
      type="button"
      value="night"
      onclick="       // target이라는 변수 안에 값을 정의하고 같은 부분을
      nightDayHandler(this);
    "
    />
    <ol>
      <li><a href="1.html">HTML</a></li>
      <li><a href="2.html">CSS</a></li>
      <li><a href="3.html">JavaScript</a></li>
    </ol>
    <h2>JavaScript</h2>
    <p>
      JavaScript (/ˈdʒɑːvəˌskrɪpt/[6]), often abbreviated as JS, is a
      high-level, dynamic, weakly typed, prototype-based, multi-paradigm, and
      interpreted programming language. Alongside HTML and CSS, JavaScript is
      one of the three core technologies of World Wide Web content production.
      It is used to make webpages interactive and provide online programs,
      including video games. The majority of websites employ it, and all modern
      web browsers support it without the need for plug-ins by means of a
      built-in JavaScript engine. Each of the many JavaScript engines represent
      a different implementation of JavaScript, all based on the ECMAScript
      specification, with some engines not supporting the spec fully, and with
      many engines supporting additional features beyond ECMA.
    </p>
  </body>
</html>
JS 객체 쓰기와 읽기
객체(Object)
클래스에 의해 정의 된 데이터 구조의 개별 인스턴스, 클래스를 한 번 정의한 다음 그 클래스에 속하는 많은 객체를 만든다. 개체는 ‘인스턴스’라고도 한다.
형식
function 함수명(가인수1, 가인수2) { 여기에 수행할 처리을 쓴다 결과를 반환한다면,
마지막에 return한다 }
<!DOCTYPE html>
<html lang="en">
  <head>
    <meta charset="UTF-8" />
    <meta http-equiv="X-UA-Compatible" content="IE=edge" />
    <meta name="viewport" content="width=device-width, initial-scale=1.0" />
    <title>Document</title>
  </head>
  <body>
    <h1>Objcet</h1>
    <h2>Create</h2>
    <script>
      var coworkers = {
        // 객체 생성
        programmer: "egoing",
        designer: "leezche",
      };
      document.write("programmer : " + coworkers.programmer + "<br>");
      document.write("programmer : " + coworkers.designer + "<br>");
      coworkers.bookkeeper = "duru"; // 객체에 데이터 추가
      document.write("bookkeeper : " + coworkers.bookkeeper + "<br>");
      coworkers["data scientist"] = "taeho"; // 객체에 데이터 추가
      document.write(
        "data scientist : " + coworkers["data scientist"] + "<br>"
      );
    </script>
  </body>
</html>
JS 객체와 반복문
객체의 데이터를 순회하는 방법
<!DOCTYPE html>
<html lang="en">
  <head>
    <meta charset="UTF-8" />
    <meta http-equiv="X-UA-Compatible" content="IE=edge" />
    <meta name="viewport" content="width=device-width, initial-scale=1.0" />
    <title>Document</title>
  </head>
  <body>
    <h1>Objcet</h1>
    <h2>Create</h2>
    <script>
      var coworkers = {
        // 객체 생성
        programmer: "egoing",
        designer: "leezche",
      };
      document.write("programmer : " + coworkers.programmer + "<br>");
      document.write("programmer : " + coworkers.designer + "<br>");
      coworkers.bookkeeper = "duru"; // 객체에 데이터 추가
      document.write("bookkeeper : " + coworkers.bookkeeper + "<br>");
      coworkers["data scientist"] = "taeho"; // 객체에 데이터 추가
      document.write(
        "data scientist : " + coworkers["data scientist"] + "<br>"
      );
    </script>
    <h2>Iterate</h2>
    <!-- 객체 안에 있는 데이터 모두 출력 -->
    <script>
      for (var key in coworkers) {
        document.write(key + " : " + coworkers[key] + "<br>"); // 객체 안에 있는 key 값과 데이터 값 출력
      }
    </script>
  </body>
</html>
JS 객체프로퍼티와 메소드
Property
객체에 소속된 변수
Method
객체에 소속된 함수
<!DOCTYPE html>
<html lang="en">
  <head>
    <meta charset="UTF-8" />
    <meta http-equiv="X-UA-Compatible" content="IE=edge" />
    <meta name="viewport" content="width=device-width, initial-scale=1.0" />
    <title>Document</title>
  </head>
  <body>
    <h1>Objcet</h1>
    <h2>Create</h2>
    <script>
      var coworkers = {
        // 객체 생성
        programmer: "egoing",
        designer: "leezche",
      };
      document.write("programmer : " + coworkers.programmer + "<br>");
      document.write("programmer : " + coworkers.designer + "<br>");
      coworkers.bookkeeper = "duru"; // 객체에 데이터 추가
      document.write("bookkeeper : " + coworkers.bookkeeper + "<br>");
      coworkers["data scientist"] = "taeho"; // 객체에 데이터 추가
      document.write(
        "data scientist : " + coworkers["data scientist"] + "<br>"
      );
    </script>
    <h2>Iterate</h2>
    <!-- 객체 안에 있는 데이터 모두 출력 -->
    <script>
      for (var key in coworkers) {
        document.write(key + " : " + coworkers[key] + "<br>"); // 객체 안에 있는 key 값과 데이터 값 출력
      }
    </script>
    <h2>Property & Method</h2>
    <script>
      coworkers.showAll = function () {
        // 객체에 소속된 변수의 값으로 함수를 만들 수 있다.
        for (var key in this) {
          // 객체에 소속된 변수 : property
          document.write(key + " : " + this[key] + "<br>");
        }
      };
      coworkers.showAll(); // 객체에 소속된 함수 :: method
    </script>
  </body>
</html>
++ 객체의 활용
<!DOCTYPE html>
<html lang="en">
  <head>
    <meta charset="UTF-8" />
    <meta name="viewport" content="width=device-width, initial-scale=1.0" />
    <script>
      var Links = {
        setColor: function (color) {
          var alist = document.querySelectorAll("a"); // 객체 생성
          var i = 0;
          while (i < alist.lenght) {
            alist[i].style.color = color;
            i += 1;
          }
        },
      };
      var Body = {
        setColor: function (color) {
          document.querySelectorAll("body").style.color = color;
        }, // 객체를 구별할떄 ',' 사용
        setBackgroundColor: function (color) {
          documnet.querySelector("body").style.backgroundColor = color;
        },
      };
      function nightDayHandler(self) {
        var target = document.querySelector("body"); // target으로 바꿔서 보기 쉽게 만든다.
        if (self.value === "night") {
          // this :: 호출에 따라 달라지는 것
          target.style.backgroundColor =
            "black"; /* doucument.querySelector('#night_day2')는 자기자신
                                                                        을 가리키고 있으므로 this로 바꾼다. */
          target.style.color = "white";
          self.value = "day";

          var alist = document.querySelectorAll("a"); // 'a' 태그가 포합된 모든 코드를 배열에 저장
          var i = 0;
          while (i < alist.length) {
            // alist 안에 배열의 길이를 가져와서 반복 횟수를 정함
            console.log(alist[i]);
            alist[i].style.color = "powderblue"; // 각 태그에 색을 지정
            i = i + 1;
          }
        } else {
          target.style.backgroundColor = "white";
          target.style.color = "black";
          self.value = "night";

          var alist = document.querySelectorAll("a");
          var i = 0;
          while (i < alist.length) {
            console.log(alist[i]);
            alist[i].style.color = "blue";
            i = i + 1;
          }
        }
      }
    </script>
    <title>Document</title>
  </head>
  <body>
    <h1><a href="index.html">WEB</a></h1>

    <input
      id="night_day"
      type="button"
      value="night"
      onclick="       // target이라는 변수 안에 값을 정의하고 같은 부분을
      nightDayHandler(this);
    "
    />
    <ol>
      <li><a href="1.html">HTML</a></li>
      <li><a href="2.html">CSS</a></li>
      <li><a href="3.html">JavaScript</a></li>
    </ol>
    <h2>JavaScript</h2>
    <p>
      JavaScript (/ˈdʒɑːvəˌskrɪpt/[6]), often abbreviated as JS, is a
      high-level, dynamic, weakly typed, prototype-based, multi-paradigm, and
      interpreted programming language. Alongside HTML and CSS, JavaScript is
      one of the three core technologies of World Wide Web content production.
      It is used to make webpages interactive and provide online programs,
      including video games. The majority of websites employ it, and all modern
      web browsers support it without the need for plug-ins by means of a
      built-in JavaScript engine. Each of the many JavaScript engines represent
      a different implementation of JavaScript, all based on the ECMAScript
      specification, with some engines not supporting the spec fully, and with
      many engines supporting additional features beyond ECMA.
    </p>
  </body>
</html>